21st Century Accounting Tutorials - Company Setup
Preferences – Selecting Forms and Dedicated Printers
Use the function-rich Forms preferences window to set up your company for efficient printing of checks, invoices, and other special documents.
Select a Form
In the Forms tab in the System/Company/Preferences window, you select the form you use to print checks, invoices, statements, and other special forms. The drop-down lists for each document show the form types supported by 21st Century Accounting as well as any other forms provided and properly installed as third-party add-ons.
Select a Dedicated Printer
You can print forms (checks, statements, invoices, and so forth) from different printers, if you wish. If you print a lot of forms, this feature allows you to keep different printers loaded with different printer forms. Then you don’t have to stop, for example, to remove check forms and insert invoice forms between printing checks and invoices.
Select the appropriate company.
Run System/Company/Preferences. The Forms window should open by default. If not, click the Forms tab at the top right.
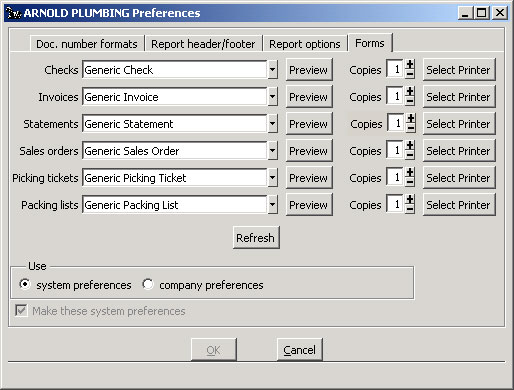
System/Company/Preferences window: Forms
Let’s look at the invoice forms.
Invoices. Tab into the Invoices field.
Select the Generic Invoice. (You may wish to select a different invoice form to test.)
Preview. Click the Preview button to the right of the Invoices form field to preview and test the selected form on your printer.
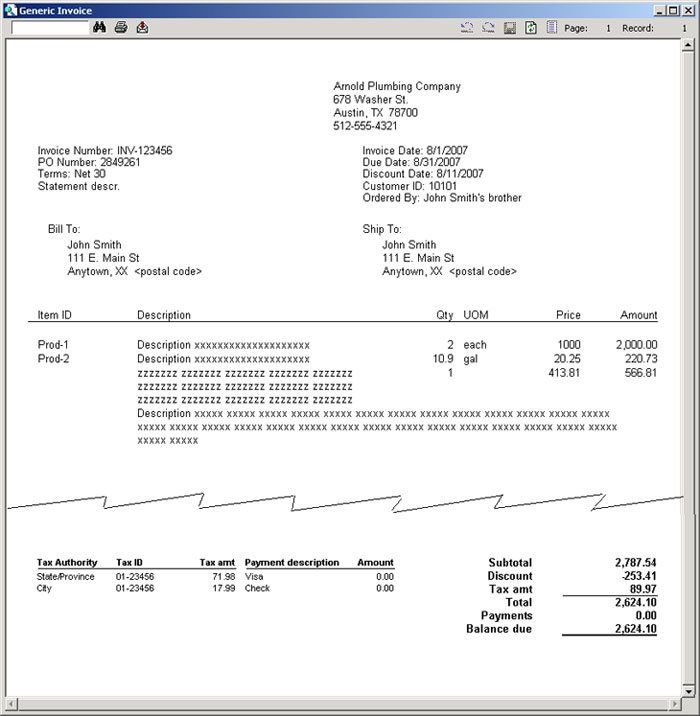
System/Company/Preferences window: Preview Generic Invoice form
Print. Preview the form, load your invoice forms into your printer, and click the printer icon at the top of the page to print a sample of the invoice to ensure correct alignment.
Try Again. If the Generic Invoice is not appropriate or does not fit correctly on your forms, try a different form.
Test print the forms |
You can Preview and test print each form on your blank invoice. For example, Multipurpose 081319 does not print the company name at the top or the tax information at the bottom of the invoice. |
If none of the forms fit, consider using a different type of invoice blank or consider printing invoices on plain paper. You may want to consider purchasing the Report Customizer, which lets you move fields, remove fields, and change fonts.
To use the Report Customizer, if you have purchased, installed, and activated it, click the Preview button.
(In older versions of 21st Century Accounting, older forms will be accompanied by an Options button to the right of the form field. You can click the Options button to see the built-in customization options for the selected form.)
Copies. Select the number of copies of this form you want to print. For example, if you always need to print an original invoice plus one copy for your files, select 2 for the number of copies.
The system will always print the form the number of times you enter here. Return to the Preferences/Forms window if you need to change the number of copies to print.
Select Printer. To select a printer other than your regular report printer for invoices, press the Select Printer button and choose a printer from a list of printers available to your computer. (You can change the choice of printer you made in Preferences when you print the invoice from the Sales/Invoices window or from Customer Status.)
You can print forms (checks, statements, invoices, and so forth) from different printers, if you wish. If you print a lot of forms, this feature allows you to keep different printers loaded with different printer forms. Then you don’t have to stop and, for example, remove check forms and insert invoice forms between printing checks and invoices.
Refresh. Click the Refresh button to update the Forms Selector lists. If Customized forms from another computer have been placed in the custom directory on your computer, the Refresh button adds the new forms to the Selector lists, thus making them available for your use.
Use system or company preferences. Click company preferences to apply the choices shown in the window.
You can apply the choices you have made in this window to this company only or you can choose to apply the choices marked as "system preferences" to this company.
-
System preferences - Mark this option to apply the "system preferences" choices to this company.
-
Company preferences - Mark this option to apply the choices in this window to this company.
-
Make these system preferences- If you choose "company preferences," you can then make those company preferences be the system preferences – the choices used by any companies you create, by checking this box.
OK. Click OK when you have completed work in this window.
Back To Top | Back To Main Tutorials Page