21st Century Accounting Tutorials - Payables
How do I enter a typical vendor invoice?
In this lesson we'll show you how to enter a "normal" Payables vendor invoice. You are ready to enter a vendor invoice for office supplies you have purchased.Follow these steps:
- Double-click the zebra icon on your desktop to start up 21st Century Accounting and use the Guest password to log in.
- Run System/Company/Select and double-click Netcon (the sample company) in the Select Company window.
- Run Payables/Vendor Invoices.
-
Batch options window.
All data entry sessions that create batches open with the Batch Options window. You establish the posting period and name for the batch, both of which initially default to today's date. You can enter any open period for posting and name the batch anything you like, up to eight characters.
Batch Name and Batch Period. Click OK to accept the defaults.
-
Payee type. Select Vendor and press the Tab key.
The choices for Payee type are "Vendor," for the regular Vendors you set up in Payables/Configure/Vendors, and "Occasional," or walk-ins and other vendors whose business in not frequent enough to justify setting them up as regular vendors. For best use of the software, enter all your regular vendors into the system. Do not use "Occasional" for vendors you expect to do business with frequently.
- Trans type. Select Purchase and press Tab.
The choices for Transaction type are "Purchase," "Credit Memo," and "Debit Memo."
-
Period. Press Tab twice to leave the displayed period.
When you enter a batch of Vendor invoices, you can change the posting period and transaction date of individual invoices, since you may have received the purchase in different shipments over a period of days.
- Vendor. Type abc and press Tab. (Or select ABC Electrical Supply from the Selector list.)
- Press Tab until you come to the Invoice Amt field. "Apply to" is used optionally to apply credit and debit memos to existing invoices. The system will supply a default invoice number if you do not assign a number.
- Invoice Amt. Type 599.95. For a purchase, you enter the total amount due from the vendor's invoice. You would enter a credit memo amount as a negative amount (precede with a minus sign).
-
Freight. Press Tab twice.
You can enter any invoice amount (such as freight charges) to exclude from calculation of the vendor's discount. The system subtracts the freight amount from the invoice total to get the discount base.
The Payment address is correct. You can change it for this invoice, if necessary.
-
GL distributions. Press Tab to distribute the full amount of the invoice to the office supplies expense account.
Since you set up and assigned a default account prompt set to this vendor, you can distribute to the automatically displayed account. Use the drop-down list to select other distribution accounts.
When the Vendor does NOT have assigned distribution accounts, you must distribute the purchase expense manually.
- In this case, no payment is entered at the time of invoice entry.
Tab through the Payment tendered fields, Status (Pay or Hold), Due date (calculated using invoice date and terms), Discount amount (if any, based on payment terms), Discount date (if any, based on payment terms), and Partial payment amount (if you don't plan to pay the total amount automatically). Press F1 at fields you want more information about.
-
Tab through the Description (prints in transaction journal) and Record on 1099.
You can click the 1099 box to indicate that payment on this particular invoice should be recorded as a 1099 payment. Then, when you post the vendor check or post payment on the vendor invoice, the actual payment amount is recorded as a 1099 payment to the vendor.
-
OK. Click the OK button or press Enter to save the entry.
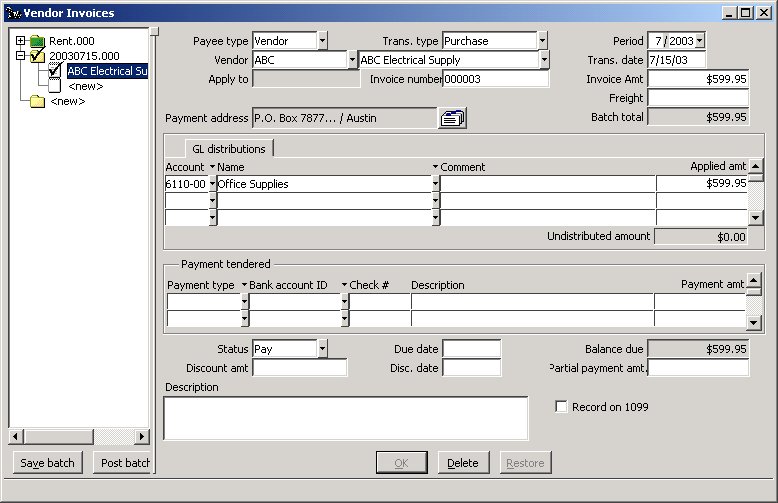
Your Vendor Invoices window should look like this:
- To print a batch listing, right-click on the batch in the left pane and select Print batch listing to Preview the batch and print a hardcopy if you wish.
- When you are done, click the Post batch button.
The cursor moves into the Payee type field in the new invoice window. You can press the F6 key if you need to move back into the left pane.
At this point, you can enter more invoices or post this one. If you enter multiple invoices, save the batch periodically.
Back To Top | Back To Main Tutorials Page