21st Century Accounting Tutorials - Payroll
Configure Income
When you set up Payroll from scratch, set up Income factors first. Of course, you can modify and add Income at any time.
If you haven’t already, run System/Company/Select and select NETCON for all the Payroll lessons.
Run Payroll/Configure/Income.
Highlight <new> and press the Tab key (or press F9 for a new entry).
Name. Type Bookkeeper Salary and press Tab.
Enter a meaningful name for each income, such as Executive Salary, Regular Hours, Overtime Hours, and so forth.
Auto assign. Press Tab to leave Auto assign unchecked.
You would check this box to automatically assign a pay factor to employees as you later add them in the Configure/Employees window. (Configuring a factor to be auto-assigned does not affect existing employees.)
For example, if most of your employees work for a regular, fixed hourly rate, check this box when you configure the "Hourly rate" income factor. Then when you add a new employee, the system automatically assigns "Hourly rate" as a pay factor.
You can delete auto-assigned factors that don't apply to specific employees in the Configure/Employees window.
Make subject to new taxes? Press Spacebar or click the box to check the option.
This option makes each income subject to new taxes. When you add taxes later in setting up your company, the income factors with this option turned on are automatically put into the "Earnings include" list for each tax (that is, they are made taxable).
Earnings subject to. Press Spacebar or click the icon to open the box. Click Select all to select all taxes in the Earnings subject to box and click OK.
In general, you make earnings subject to existing taxes by selecting the taxes in the "Earnings subject to" box OR you make taxes include certain pay factors as taxable in the "Earnings include box" in the Taxes window. The system automatically updates one "taxable status" box when you update the other "taxable status" box.
Additional W-2 reporting. Press Tab.
The default of "None" is correct for most earnings. The system automatically reports taxable earnings on W-2s. Press F1: Help to see how to handle W-2 reporting of other types of income.
Contribution method. Select Salary for the method and press Tab.
Choose the method you want the system to use to calculate the income, like straight salary, hourly rate, percent of sales, and so forth. Then you press the Tab key to display the prompts associated with that contribution method in the Options section of the window below.
GL account. Select 6010-02 Salary & Wages - Administrative from the Selector list.
Enter a General Ledger account, normally a Payroll expense account, for posting the income. You can ignore the warning that the account is in use, if you wish.
Salary. Press Tab.
For certain types of income, you can enter a default amount. Usually you'll leave the amount blank in the Income window and fill in the amount or rate at the employee level (in the Employees windows).
For sales commissions, piece rates, and certain other types of income, you'll enter additional information the system uses to calculate the income when you run Calculate or ATF Payroll.
Click OK to save your work so far.
Here is how your completed Income window should look.
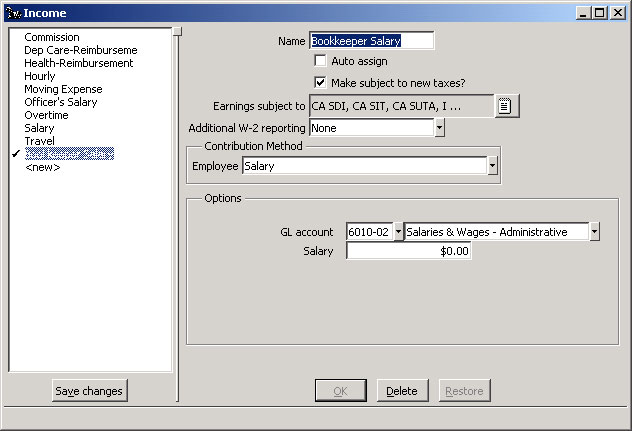
Payroll: Configure Income window
Press the Save changes button in the left pane to permanently record the income you have just configured.
Back To Top | Back To Main Tutorials Page