21st Century Accounting Tutorials - Sales
How do I enter a typical customer sales invoice?
Click the Play button to view this video tutorial.
In this lesson we'll show you how to enter a "normal" Receivables customer invoice. You are ready to invoice the customer for the consulting services provided by your company.Follow these steps:
- Double-click the zebra icon on your desktop to start up 21st Century Accounting and use the Guest password to log in.
- Run System/Company/Select and double-click Netcon (the sample company) in the Select Company window.
- Run Sales/Invoices.
The empty left pane shows you that there are no existing, unposted batches of invoices.
-
Batch options window.
All data entry sessions that create batches open with the Batch Options window. You establish the posting period and name for the batch, both of which initially default to today's date. You can enter any open period for posting and name the batch anything you like, up to eight characters.
Batch Name and Batch Period. Click OK to accept the defaults.
-
Customer type. Select Customer and press the Tab key.
The choices for Customer type are "Customer," for the regular customers you set up in Receivables/Configure/Customers, and "Occasional," or walk-ins and other customers whose business in not frequent enough to justify setting them up as regular customers. For best use of the software, enter all your regular customers into the system. Do not use "Occasional" for customers you expect to do business with frequently.
- Trans type. Select Sale and press Tab.
The choices for Transaction type are "Sale," "Credit Memo/Return," and "Debit Memo."
- Customer. Type aug and press Tab. (Or select August & Associates from the Selector list.)
- Press Tab through the fields until you come into the Item ID field.
The system will supply a default invoice number if you do not assign a number. "Apply to" is used optionally to apply credit and debit memos to existing invoices. You use "Order number" and "Ordered by" if you start a sale with a Sales Order. The optional "PO number" is for the customer's information. You set up, assign to customers, automatically calculate, and track sales taxes ("Tax group") if you wish.
- Item ID. Select Consulting from the Product List by displaying the Selector list. Press Tab twice.
To sell products and services that are not on the Product List, you can press Tab at the Item ID field to skip it, move to Description, and type your own Description, brief or lengthy.
-
Type 2 for the quantity (under Qty) purchased, that is, 2 hours' consulting time. Tab through the remaining Invoice detail fields.
Since "Consulting" has an assigned distribution account in the Product List, the system automatically distributes this sale to the account assigned to the product. If you click the GL distributions tab you will see the customer's assigned account prompts, in case you want to change the distribution of this sale. If a tax group had been assigned to the customer, you could click the Tax info tab to see tax details associated with the assigned tax group.
When the items you sell on the invoice and the customer you sell the items to do NOT have assigned distribution accounts, you must distribute the sale income manually.
- In this case, no payment is entered at the time of invoice entry. You are finished with this invoice.
Tab through the Payment tendered fields, Payment terms (displays terms assigned to the customer), Due date (calculated using invoice date and terms), Statement description (prints on statement), Address, and Description (prints on invoice). Press F1 at fields you want more information about.
-
OK. Click the OK button or press Enter to save the entry.
Your Invoices window should look like this:
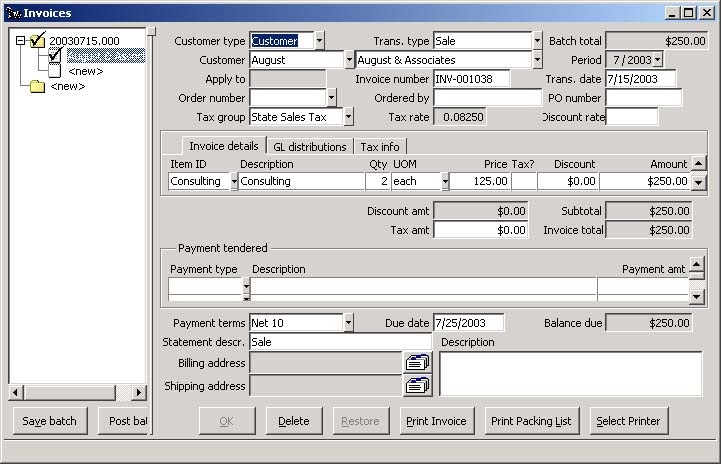
- To print a batch listing, right-click on the batch in the left pane and select Print batch listing to Preview the batch and print a hardcopy if you wish.
- When you are done, click the Post batch button.
The cursor moves into the Customer type field in the new invoice window. You can press the F6 key if you need to move back into the left pane.
At this point, you can enter more invoices or post this one. If you enter multiple invoices, save the batch periodically. You can print the invoices and packing lists as you go.
Back To Top | Back To Main Tutorials Page