21st Century Accounting Tutorials - Payroll
Complete Payroll Setup
What are the steps I should follow for setting up Payroll?
Setting up Payroll consists of installing the current Tax Tables, configuring Payroll Company Information for several options (if desired), configuring pay factors (income, deductions, noncash benefits, accruals, and taxes, plus Workers' Comp. Codes if you track WC-covered jobs), and then adding employees and assigning their pay factors and other attributes.Follow these steps:
- If you have not already done so, run Bank Accounts/Configure/Bank Accounts to designate one or more of your bank accounts as the account(s) from which Payroll checks are issued. (Do NOT set up a separate checking account for Payroll unless you actually use a separate bank account for Payroll.)
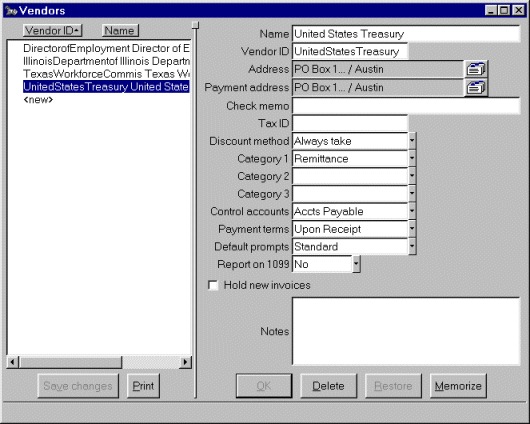
- If you intend to use the Payroll Remittance Checks function, run Payables/Configure/Vendors to set up Payroll tax remittance payees as vendors and then designate the appropriate remittance vendor for each Payroll tax when you configure the tax in the Payroll/Configure/Taxes window. You can see some sample remittance vendors in the Configure/Vendors window shown below.
- Run Payroll/Configure/Company Information to optionally —
- Select the Payroll departmentalization option that is appropriate for the company. Click here for more information about the options.
- Turn on the option for manual pay distribution if you intend to use this feature.
- Check the option box if you want to print vacation and sick balances on paycheck stubs.
- If you want to use the feature, turn on the option to automatically calculate accrual pay amounts when you enter the number of accrual hours paid out when you run Calculate or ATF Payroll.
- When you are setting up Payroll from scratch, set up pay factors used in your company's Payroll IN THIS ORDER for maximum effectiveness.
See the individual factor setup lessons for detailed instructions on setting up the factors.
- Income
- Deductions
- Noncash Benefits
- Vacation and Sick Accruals
- Tax Calculations (if you have a local Payroll Tax)
- Taxes
- Workers' Comp. Codes (if you track and report Workers' Comp)
- Employees
Add your company's employees, assign and customize pay factors, assign departments (if you turned on "departmentalization"), and enter any HR information you want to maintain. See the individual Employees setup lesson for detailed instructions on setting up employees.
How do I set up Payroll Income factors?
When you set up Payroll from scratch, set up Income factors first. Of course, you can modify and add Income factors at any time.For more information at any field in the window, press F1: Help.
Follow these steps.
- Run Payroll/Configure/Income.
- Highlight <new> and press the Tab key.
- Enter a meaningful name for the income, such as Executive Salary, Regular Hours, Overtime, and so forth.
- The "Auto assign" option in the Income window allows you to
automatically assign an income to future employees.
Then when you subsequently add employees, any income factor
with this option turned on is automatically assigned.
You can delete it manually from employees for whom
the factor is not appropriate. For income factors
(for example, "Hourly rate") that are common to most employees
you will later add to the company, turn on the "Auto assign" option.
(Changing a factor to be auto-assigned does not affect existing employees.)
- Check the "Make subject to new taxes" option in the Income window. This makes each income subject to new taxes. When you add taxes later in setting up your company, the income factors with this option turned on are automatically put into the "Earnings include" list for each tax (that is, they are made taxable).
- Tab through "Earnings subject to." The box is empty because you haven't set up any Payroll taxes yet. This box will be automatically filled as you add Payroll taxes with Configure/Taxes.
(You can press the spacebar or click the icon to the right of the field to see what's in the box.)
- The default of "None" at "Additional W-2 reporting" is correct for most earnings. The system automatically reports taxable earnings on W-2s. Press F1: Help to see how to handle W-2 reporting of other types of income.
- Select the "Contribution method" you want the system to use to calculate the income, like straight salary, hourly rate, overtime multiplier, percent of sales, and so forth. Press the Tab key to display the prompts associated with that contribution method in the Options part of the window below.
- Enter a General Ledger account, normally a Payroll expense account, for posting the income.
- For certain types of income, you can enter a default amount. Usually you'll leave the amount blank in the Income window and fill in the amount or rate at the employee level (in the Employees windows).
For overtime multiplier, sales commissions, piece rates, and certain other types of income, you'll enter additional information the system uses to calculate the gross income amount when you run Calculate or ATF Payroll.
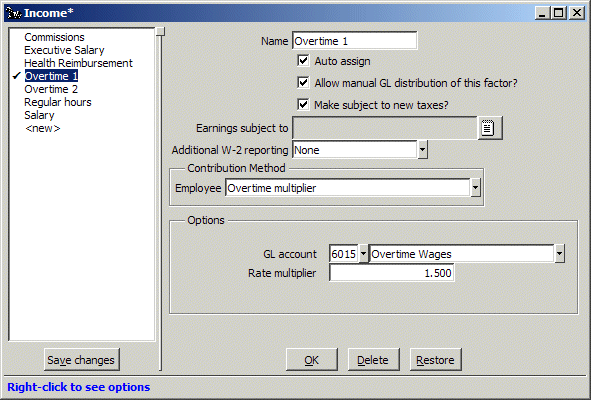
For example, the contribution method "Overtime multiplier" creates overtime pay that is calculated as shown below, after you enter the number of hours worked in Calculate Payroll —
Set up Designate Calculate In Configure/Income
— Hourly rate factor
— Overtime multiplier factorIn Configure/Employees
— Hourly rate as "Base factor"
for Overtime multiplierIn Calculate Payroll
— multiplier X rate
X number of hours worked - Click OK to save your work so far.
Here is how a completed Income window might look.
- Click Save changes to save the factor.
How do I set up Payroll Deductions factors?
When you set up Payroll from scratch, set up Deductions factors second (after Income). Of course, you can modify and add Deductions factors at any time.For more information at any field in the window, press F1: Help.
Follow these steps.
- Run Payroll/Configure/Deductions.
- Highlight <new> and press the Tab key.
- Enter a meaningful name for the Deduction, such as 401(k), Dependent Care, and so forth.
- The "Auto assign" option in the Deductions window allows you to automatically assign a Deduction to future employees. When you add employees, any Deductions factor with this option turned on is automatically assigned to all employees, although you can delete it manually for employees for whom the factor is not appropriate. For Deductions factors (for example, 401[k]) that are common to most employees in the company, turn on the "Auto assign" option.
- The "Deduct before new taxes" option in the Deductions window allows you to set up each deduction to be deducted before or after taxes are calculated.
If your deduction is a pretax deduction, like a 401(k) or an approved savings plan benefit, check the "Deduct before new taxes" option in the Deductions window. When you add taxes, the deduction factors with this option turned on are automatically put into the "Earnings include" list for each tax. Pretax deductions are put into a tax's earnings include list so the deduction will be deducted before the tax is calculated.
- Tab through "Deduct before." The box is empty because you haven't set up any Payroll taxes yet. For deductions marked "Deduct before new taxes," this box will be automatically filled as you add Payroll taxes with Configure/Taxes.
- The default of "None" at "Additional W-2 reporting" may or may not be correct for this deduction. Press F1: Help to see how to handle W-2 reporting of various types of Deductions. Review your W-2 instructions if you are in doubt.
For example, for a 401(k) deduction, select "Employee 401k" for additional W-2 reporting from the list.
- Select the "Contribution method" you want the system to use to calculate the employee Deduction and, if appropriate, the employer contribution.
Click the Options button to display the prompts associated with the contribution methods in the Options part of the window below.
- Enter a General Ledger account, normally a Payroll liability account, for posting the Deduction.
- Note that "Percent of earnings" deductions will show the Incomes you have already set up in the "Earnings Include" box.
- Click OK to save your work so far.
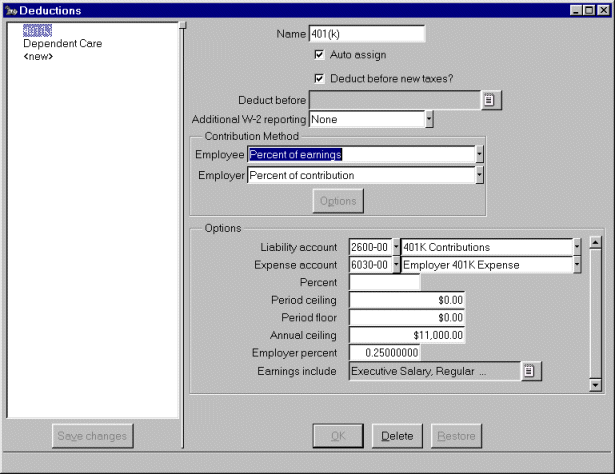
Here is how a completed Deductions window might look.
- Click Save changes to save the factor.
(You can press the spacebar or click the icon to the right of the field to see what's in the box.)
If the employer contributes (to a 401(k), for example), enter a General Ledger account, normally a Payroll expense account, for posting the employer's contribution.
Many deductions have period or annual ceilings and floors. You may need to enter such additional information the system uses to calculate the Deduction.
How do I set up Payroll Noncash Benefits factors?
When you set up Payroll from scratch, set up Noncash Benefits factors third (after Income and Deductions). Of course, you can modify and add Noncash Benefits factors at any time.For more information at any field in the window, press F1: Help.
Follow these steps.
- Run Payroll/Configure/Noncash Benefits.
- Highlight <new> and press the Tab key.
- Enter a meaningful name such as Use of Company Car.
- The "Auto assign" option in the Noncash Benefits window allows you to automatically assign a Noncash Benefit to future employees. When you add a new employee, any Noncash Benefit factor with this option turned on is automatically assigned. You can delete it manually for employees for whom the factor is not appropriate. For Noncash Benefit factors that are common to most employees in the company, turn on the "Auto assign" option.
- Most Noncash Benefits of this type are taxable. Check the "Make subject to new taxes" option in the Noncash Benefits window. This makes the Noncash Benefit subject to new taxes. When you add taxes later in setting up your company, the Noncash Benefits factors with this option turned on are automatically put into the "Earnings include" list for each tax (that is, they are made taxable).
- Tab through "Earnings subject to." The box is empty because you haven't set up any Payroll taxes yet. This box will be automatically filled as you add Payroll taxes with Configure/Taxes.
(You can press the spacebar or click the icon to the right of the field to see what's in the box.)
- The default of "None" at "Additional W-2 reporting" may or may not be correct for this benefit. Press F1: Help to see how to handle W-2 reporting of various types of Noncash Benefits. Review your W-2 instructions if you are in doubt.
- Select the "Contribution method" you want the system to use to calculate the Noncash Benefit, like percent of earnings or amount per pay period. Press the Tab key to display the prompts associated with that contribution method in the Options part of the window below.
- For certain types of Noncash Benefits, you can enter a default amount or rate. Often you'll leave the amount or rate blank in the Noncash Benefits window and fill in the amount or rate at the employee level (in the Employees windows).
Many Noncash Benefits have period or annual ceilings and floors. You may need to enter such additional information the system uses to calculate the benefit.
- Click OK to save your work so far.
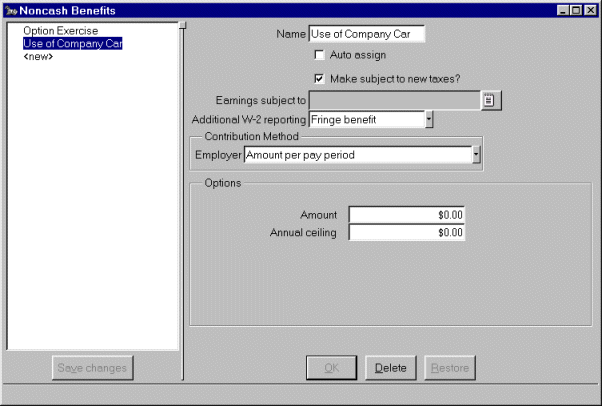
Here is how a completed Noncash Benefits window might look.
- Click Save changes to save the factor.
How do I set up Payroll Vacation and Sick Accruals?
When you set up Payroll from scratch, set up Vacation and Sick Accruals factors fourth (after Income, Deductions, and Noncash Benefits). Of course, you can modify and add accruals factors at any time.
So that you can expense vacation and sick pay separately from regular pay, when you set up an accrual, the system automatically creates an accrual payout factor. You assign a vacation or sick pay expense account for use by the payout factor and then you enter the optional vacation or sick pay amount paid when you process Payroll.
If you want to track vacation and sick hours earned but do not want to track vacation or sick time paid out - that is, you do not want to expense vacation and sick time separately - simply ignore the associated vacation and sick payout factor ("Hours paid") in the Payroll window.
Finally, if you don't accrue vacation and sick hours, you can ignore the Accruals function altogether. If you do not want to track accrued vacation or sick hours but you do want to expense vacation and sick payout separately from regular pay, simply set up separate Income factors for vacation and sick pay.
For more information at any field in the window, press F1: Help.
Follow these steps.
- Run Payroll/Configure/Vacation and Sick Accruals.
- Highlight <new> and press the Tab key.
- Enter a meaningful name such as Sick Days or Vacation Days.
- The "Auto assign" option in the Vacation and Sick Accruals window allows you to automatically assign an Accrual to future employees. When you add employees, any Accrual factor with this option turned on is automatically assigned to all employees, although you can delete it manually for employees for whom the factor is not appropriate. For Accrual factors that are common to most employees in the company, turn on the "Auto assign" option.
- Most Vacation and Sick Accrual payouts of this type are taxable. Check the "Make subject to new taxes" option in the Vacation and Sick Accruals window. This makes each Accrual payout subject to new taxes. When you add taxes later in setting up your company, the payout factors automatically created for the Vacation and Sick Accruals factors with this option turned on are automatically put into the "Earnings include" list for each tax (that is, they are made taxable).
- Tab through "Earnings subject to." The box is empty because you haven't set up any Payroll taxes yet. This box will be automatically filled as you add Payroll taxes with Configure/Taxes.
(You can press the spacebar or click the icon to the right of the field to see what's in the box.)
- Select the "Contribution method" you want the system to use to calculate the Accrual, like percent hours worked or hours per pay period. Press the Tab key to display the prompts associated with that contribution method in the Options part of the window.
- Enter a General Ledger account, normally a Payroll expense account, for posting the paid out accrual.
Vacation and Sick Accruals often have annual ceilings. You can enter such additional information the system uses to calculate the Accrual.
For certain types of Vacation and Sick Accruals, you can enter a default number of hours accrued per pay period or percent of hours worked per pay period. You can leave the number of hours or percent blank in the Vacation and Sick Accruals window and fill in the number or percent at the employee level (in the Employees windows).
- Click OK to save your work so far.
Here is how a completed Vacation and Sick Accruals window might look.
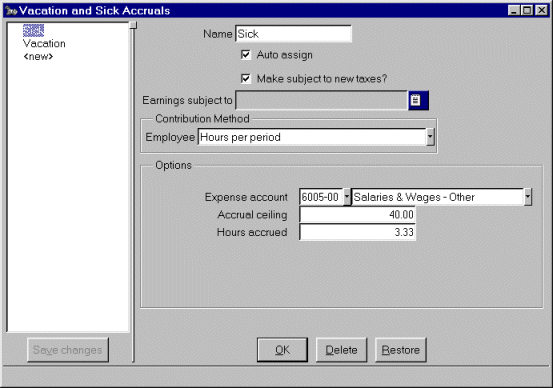
- Click Save changes to save the factor.
How do I set up Payroll Tax Calculations factors?
When you set up Payroll from scratch, use the Tax Calculations window only if user-defined Taxes apply to your employees or if you want to edit the SUTA maximum Taxable earnings. Set up Tax Calculations factors fifth, after Income, Taxes, Noncash Benefits, and Accruals. Of course, you can modify and add Tax Calculations factors at any time.For more information at any field in the window, press F1: Help.
Follow these steps to set up a user-defined Tax.
- Run Payroll/Configure/Tax Calculations.
- Highlight <new>, press the Tab key, and enter a meaningful name for the user Tax.
- Select the appropriate W-2 box for "Additional W-2 reporting." The default of "None" at "Additional W-2 reporting" is correct for Taxes supported by the Payroll Tax Updates. User-defined Taxes may have other requirements for W-2 reporting such as Local Tax box or Other information box. Review your W-2 instructions if you are in doubt.
- Select the "Contribution method" you want the system to use to calculate the employee Tax and, if appropriate, the employer contribution.
"Earnings calculation" lets you set up the earnings base -- straight earnings, earnings minus exemptions, and so forth. Select from the drop-down list.
Click the Options button to display the prompts associated with the contribution and Taxable earnings calculation methods in the Options part of the window below.
You assign posting accounts when you assign a Tax to a company in Configure/Taxes. In this window, you enter the calculation information.
- User-defined Taxes may require maximum and minimum earnings levels to kick in. They may require Tax ceilings. You will need to enter such additional information the system uses to calculate the Tax.
- Click OK to save your work so far.
Here is how a completed Tax Calculations window might look.
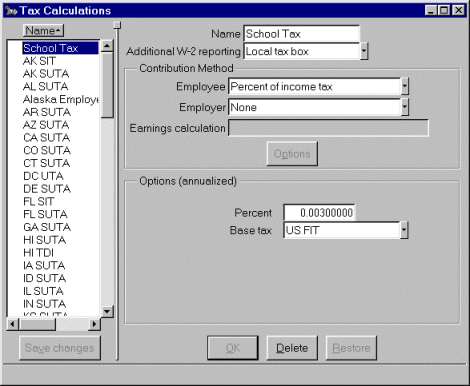
- Click Save changes to save the factor.
How do I set up Payroll Taxes factors?
When you set up Payroll from scratch, set up Taxes factors last, after Income, Deduction, Noncash Benefits, Accruals, and Tax Calculations (which you use only if user-defined Taxes apply to the company). In this window, you assign the appropriate Taxes to a company from among ALL available Taxes -- either Federal and state Taxes supported by the Tax Update Tables or user-defined Taxes you created. Of course, you can modify and add Taxes factors at any time.For more information at any field in the window, press F1: Help.
Follow these steps.
- Run Payroll/Configure/Taxes.
- Highlight <new> and press the Tab key.
- Select the Tax from the drop-down list.
- The "Auto assign" option in the Taxes window allows you to automatically assign a Tax to future employees. When you add employees, any Tax factor with this option turned on is automatically assigned to all employees, although you can delete it or configure it manually for employees to whom the Tax does not apply. For Taxes factors (for example, US FIT) that are common to most employees in the company, turn on the "Auto assign" option.
- AT "Reporting ID," enter the company's EIN.
- Select the "Remittance vendor" from the drop-down list of vendors. You should have already set up the financial institutions or Federal Reserve Banks to whom you remit Payroll Taxes as Payables vendors. Now you associate the appropriate Payroll Tax (US FIT, for example) with that vendor in the Payroll/Configure/Taxes window. (You can set up Remittance vendors now, if you haven't already done so. Press F9.)
- Tab through the "Current liability" field. When you set up Payroll from scratch, this amount is zero because no Tax deductions have been posted by Payroll calculation/posting. After you post Payroll, the amount shown in this field should be the amount you owe the remittance vendor for this Tax when you prepare a Remittance Check.
If later you need to edit the amount, right-click on the "Current liability" field and select "Override current liability" from the options menu. Enter the outstanding liability from your records and press the Tab key. This modifiable field allows you to synchronize the Print/Remittance Checks function with your current records.
- The default of "None" at "Additional W-2 reporting" is correct for Taxes supported by the Tax Update Tables. Local Taxes may have other requirements. Review your W-2 instructions if you are in doubt.
- The "Contribution method" the system uses to calculate the employee Tax deduction and, if appropriate, the employer contribution, are determined by the Tax Update Tables -- or you set them up as user-defined Taxes in the Configure/Tax Calculations window. These fields are read-only.
- Enter a General Ledger account, normally a Payroll liability account, for posting the Tax deduction.
- Note that Taxes will show the pay factors you have already set up as "Make subject to new Taxes" in the "Earnings Include" box.
- Click OK to save your work so far.
Here is how a completed Taxes window might look.
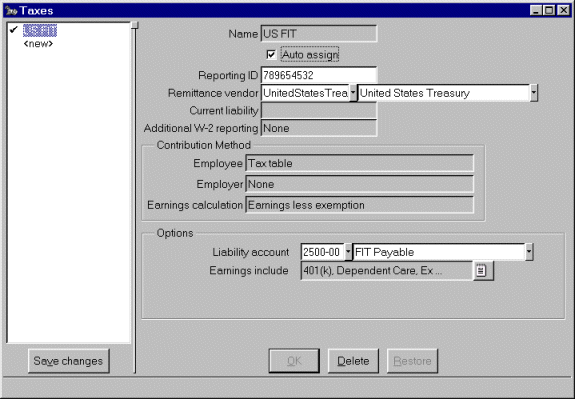
- Click Save changes to save the factor.
If the employer contributes (to US SS, US Med, or a state unemployment Tax, for example), enter a General Ledger account, normally a Payroll expense account, for posting the employer's contribution.
How do I set up Workers' Comp. Codes?
When you set up Payroll from scratch, set up all the Workers' Compensation classification codes that identify the kinds of Workers' Comp.-covered jobs assigned to your employees before you add Employees. Of course, you can modify and add Workers' Comp. Codes at any time.For more information at any field in the window, press F1: Help.
Follow these steps.
- Run Payroll/Configure/Workers' Comp. Codes.
- The official WC IDs identify the Workers' Compensation Codes
that apply to your employees.
- Names help identify each Workers' Compensation Code. The name might identify the kind of work associated with the code.
- The rate is assigned to each Workers' Comp. Code. You type the rate as you see it in your WCC documentation; for example, type a rate of 5.63 as 5.63.
- For each WC Code, select a calculation method from the options, as described below. The calculation method determines how the Workers' Compensation Report calculates the unadjusted "Premium" associated with the covered earnings or hours.
The Workers' Comp. calculation methods work as follows:
- Rate times earnings. The calculated WC "premium" on the Workers' Compensation Report is the rate you enter in this window times the calculated earnings (up to the ceiling, if there is one) for the factors that are assigned to WC Codes that use this rate.
-
Rate times earnings - no overtime multiplier. The calculated WC "premium" on the Workers' Compensation Report is the rate you enter in this window times the calculated earnings (up to the ceiling, if there is one) for the factors that are assigned to WC Codes that use this rate.
Earnings for overtime factors assigned to WC codes using this rate are calculated at the base factor rate (no Overtime multiplier).
-
Rate times hours. The calculated "premium" on the Workers' Compensation Report is the rate you enter in this window times the hours worked for the factors that are assigned to WC Codes that use this rate.
- A ceiling may be assigned to the Worker's Comp.-covered earnings associated with this WC Code.
The ceiling, if there is one, is taken into account across the transaction date range you specify when you print the report. The system does not track "earnings subject to" with and without ceiling as it does with taxes. For example, when you print the Workers' Compensation Report from April 1st of one year to April 1st of the next, if an employee's covered pay for that date range exceeds the ceiling, the pay is capped at the ceiling for the purpose of calculating a premium.
The ceiling field is disabled for Rate times hours.
- Now highlight <new> and press the Tab key.
- Configure the following WC Codes if you want to see the WC calculations reflected on the Workers' Compensation Report for the tutorial data:
WC Code Description Rate Calculation method Ceiling 8075 Retail .78 Rate times earnings
- no overtime multiplier1,000 OK 5199 Maintenance 2.79 Rate times hours NA OK 7206 Installation 1.45 Rate times earnings None OK - Click OK and Save changes.
Here is how a completed Workers' Comp. Codes window might look.
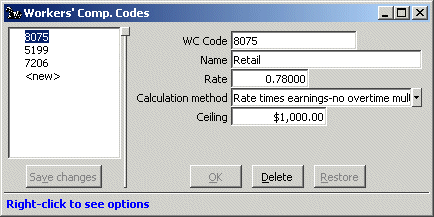
Read the information in Steps 2 - 7. Then fill in the Workers' Comp. Code windows with the data in Step 8.
Employees
When you set up Payroll from scratch, set up Employees last. Of course, you can modify and add Employees at any time.For more information at any field in the window, press F1: Help.
Follow these steps.
- Run System/Company/Select and double-click TutCo in the Select Company window. TutCo is the company you created in the "Create a new company" lesson.
- Run Payroll/Configure/Employees.
- Highlight <new> and press the Tab key.
- At "Name," enter Craftsman| Bruce W..
If you want the name to be alphabetized by last name on reports and to be printed first name first on paychecks and W-2s, enter names last name first, separated from the first name by a vertical bar (|) (and a space so it will look nice), like this:
SSA instructions specify entering the suffix only if it appears on the employee's Social Security card.Format: LastName, Suffix | FirstName MiddleInitialOrName Examples: Bates | Norman Xavier
O'Hara | Thomas
de la Cruz, Jr | Martin
Poe-Knickerbocker | Jane
McPherson | Donald P(The "|" may look like a vertical dashed line on your keyboard. The key is usually to the upper right of the character keys.)
Names with this format print on paychecks as Bruce W. Craftsman, for example. - At "Employee ID," enter 2002.
- At "SSN," enter 456789012.
- At "Pay frequency," select Semimonthly from the drop-down list.
- Check any "W-2 filing information" boxes that apply (or wait until you're ready to print W-2s).
- Now you configure the employee's pay factors. (You can Tab through the fields or press Enter to move down the window if you're in Keypad mode or mouse to the fields you intend to modify.) But first, some tips:
Suggestions for using the Employee window
- Enter amounts, hours worked, vacation and sick hours accrued, and percents that are the same every pay period. When you make a Payroll run, calculations that use these values are automatic.
- Leave the variable values as "0.00" — you will fill them in when you run Payroll. These values might be, for example, regular and overtime hours worked, expense reimbursements, vacation or sick hours taken.
- If you track and report Workers' Compensation-covered jobs, once you've set up the WC Codes that apply to those jobs, you assign the codes to the jobs when you assign the jobs (Incomes) to employees.
- Enter tax filing statuses, exemptions, and other information from the employee's W-4, W-5, or other equivalent forms.
- To DELETE factors, mouse over a factor, right click, and select Delete from the menu.
If you're a keyboarder and not a mouser, Tab into the factor field, press the Windows Menu key (to the right of the Windows Icon key to the right of the Spacebar), and select Delete from the menu. - To ADD factors, click the <new> button and select a factor from the drop-down list. Or in an active part of the window, mouse-click (or press the Windows Menu key), and select <new> from the menu.
- Now let's continue entering Bruce's employee configuration.
"Regular hours Rate" Enter 20 "Regular hours Workers' Comp Code" Select 7206 "Overtime 1 Base factor" Select Regular hours "Overtime 1 Rate multiplier" Enter 1.5 "Overtime 1 Workers' Comp Code" Select 7206 "Overtime 2 Base factor" Select Regular hours "Overtime 2 Rate multiplier" Enter 2 "Overtime 2 Workers' Comp Code" Select 7206 "Sick Leave Accrual ceiling" Enter 20 "Sick Leave Hours accrued" Enter 20 "Vacation Accrual ceiling" Enter 40 "Vacation Hours accrued" Enter 1.6 "401K Percent" Enter .07 "US FIT Exemptions" Enter 3 "US FIT Filing Status Select Married - Click OK to save your work so far.
Here is how Bruce's Payroll Info window looks.
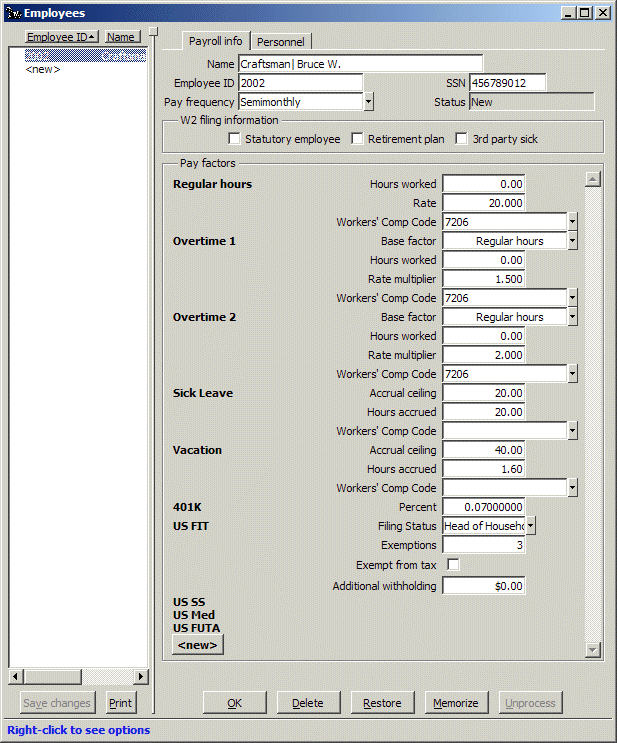
- Click Save changes to save the employee.
The Payroll Info panel in the Employees window displays some typical pay factors that would have been checked for automatic assignment to employees.
The Personnel page contains information that is not used directly by Calculate Payroll, such as personal address, birthdate, hire date, and so on. The fields on the Personnel page are optional.
- Click the Personnel tab at the top of the window.
- Click the address card icon or press the Spacebar to open the employee's address window. Enter the address if you wish.
- Enter the following information for Bruce Craftsman.
"Sex" Select Male "Job title" Enter Assistant Director "State of employment" Select Texas "Birthdate" Enter 03/07/1972 "Hire date" Enter 01/01/2006 "Categoy 1" Press F9, type Managers, click Save changes You have added "Managers" to the list of categories (which you can also open by running Configure/Categories from the menu). It will now be available in the Category drop-down list for all employees.
State of employment and Category can be used to sort or select data on checks and on some reports.
- Click OK to save your work so far.
Here is how a completed Employee Personnel window might look.
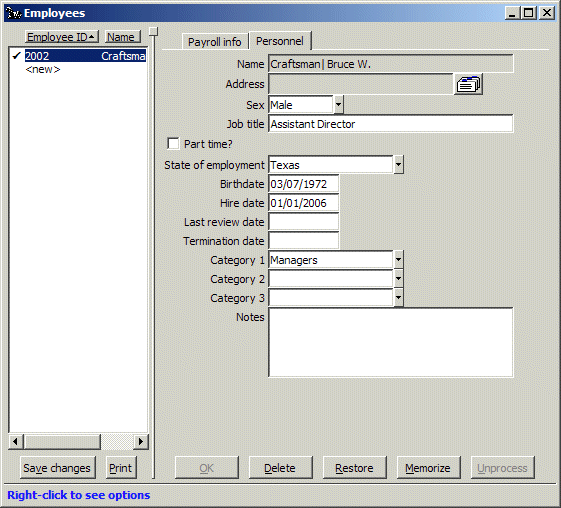
- Click Save changes to save the employee.
Run Payroll/Configure/Historical Pay Information to enter to-date pay totals, if you are bringing the company over from another accounting system after running Payrolls in that system in the current calendar year. Updating employees in 21st Century Accounting for historical Payroll data from another system allows you to issue correct 941s and end-of-year W-2s from 21st Century Accounting. It also tells the system where employees are with respect to minimums, maximums, ceilings, and floors.
Back To Top | Back To Main Tutorials Page